My blog is to help you connect to Stampin' Up! products, projects, ideas, techniques

and promotions to inspire, energize and fulfill your creative dreams and needs.

Showing posts with label turtle friends. Show all posts

Friday, April 1, 2022

Turtle Friends Spotlight #3


Hello friends!  I am excited to share the last post for my Turtle Friends Spotlight.


This is the Turtle Friends stamp set and Turtle Punch that are 10% off when you buy the bundle.


I love the Party Pattern designer series paper that is exclusive with Stampin' Reward host benefits.  I hope you will enjoy making this card design, follow the instructions below.  The supplies are listed at the end of the post.


COLORS

Basic White

Polished Pink

Basic Black


MEASUREMENTS

Complete list of supplies needed is listed below. A die cutting machine is needed for this card.

Polished Pink:

  • 8 1/2″ h x 5 1/2″ w scored and folded at 4 1/4″ h for Card Base

  • 2″ x 2″ scrap for the Sentiment Matte

Pattern Party Designer Series Paper:

  • 3 3/4″ h x 5 1/2″w

  • 2 3/4″ h x 2 3/4″ w die cut with Scalloped Contours Dies and trimmed to 2 1/2″ square

Basic Black Cardstock:

  • min 1/2″ h x 5 1/2″ w (could be up to 3 15/16″ h)

Basic White Cardstock:

  • 4″ h x 5 1/4″ w for the inside

  • 2″ x 2″ scrap for the Sentiment die cut with the 1 5/8″ Smooth Edge Layering Circles Die

INSTRUCTIONS

  1. Affix all stamps to Acrylic Blocks.

  2. Fold the Card Base in half using a Bone Folder to sharpen the crease.

  3. Attach the Basic Black Cardstock to the 3 3/4" h x 5 1/2" w Pattern Party DSP leaving about 1/8" showing and attach to the Card Base.

  4. Wrap Open Weave Polished Pink Ribbon around the Card Base and tie a bow slightly off center.

  5. Die Cut the 2" x 2" Basic White with the 1 5/8" Smooth Edge Circle and the 2" x 2" Polished Pink with the 1 3/4" Scalloped Circle Die.

  6. Stamp the Turtle in Tuxedo Black Memento Ink and the Shell and Sentiment in Polished Pink Ink on the Basic White 1 5/8" Smooth Edge Circle and attach to the 1 3/4" Polished Pink Scalloped Circle.

  7. Die cut the 2 3/4" h x 2 3/4" w Pattern Party DSP and trim to 2 1/2" square.

  8. Attach the Matted Sentiment to the 2 1/2" square Pattern Party DSP with Dimensionals and attach the 2 1/2" square Pattern Party DSP to the Card Base with Dimensionals.

  9. Sprinkle on the gems.

  10. Stamp and decorate the 4" h x 5 1/4" w Basic White inside and attach with Stampin' Seal.

  11. Decorate your envelope.

  12. Adorable! Who is having a baby girl?

Shop the Online Store


My online store is open 24 hours at http://bit.ly/shopwithJaney

Please use the April 2022 online order 
host code, 
YRGWQ2Q9.

If your order is $150+ then you will earn your own Stampin' Rewards and do not use the host code.
Anyone that orders $35+ of products online, you will receive the April 2022 IDEAS tutorial bundle to show my gratitude!
Customers are also welcome to order the IDEAS tutorial bundle without a product order or to send as a gift (see the side bar for the ordering link).

Subscribe now to never miss a blog post:


Product List
Janey

Wednesday, March 23, 2022

Turtle Friends Spotlight #2 and Last Chance Products

Hello crafters, I am happy to share the Turtle Friends Spotlight with you this week.  Today is design #2.  

First let's look at the Retiring Products list for our 2021-2022 Annual Catalog


Download the list to print, click here.

Shop Last Chance Sale Now, click here.


Turtle Friends Spotlight #2


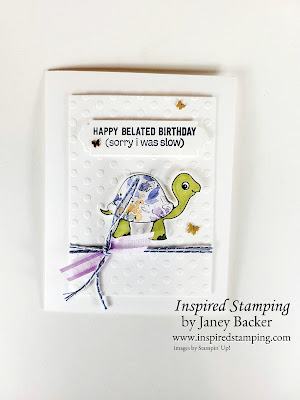
Wouldn't this card be fun to send to a girlfriend?  I often need a belated card so this is a perfect design to make a few extras to have on hand. 


The colorful Hand Penned designer series paper is so bright and airy and a fun contrast to this plucky turtle.


I hope this card inspires you and that you will enjoy making this at home.  The tutorial is below and the supply list is at the end of this post.  Products are available while supplies are available, so don't be a slow turtle, be sure to order what you like!

COLORS

Misty Moonlight

Highland Heather

Fresh Freesia

Old Olive

Basic White


MEASUREMENTS

Complete list of supplies needed is listed below. A die cutting machine is needed for this card.

Basic White Thick Cardstock:

  • 5 1/2” h x 8 1/2" w folded to 4 1/4” w for Card Base

  • 3” square scrap for Turtle Punch

Basic White Cardstock:

  • 3/4" h x 3 1/4" w for Sentiment

  • 4 1/2" h x 3 1/4" w for embossed layer

  • 5 1/4" h x 4” w for inside

Hand-Penned Designer Series Paper:

  • 3” square scrap for Turtle Shell

INSTRUCTIONS

  1. Affix all stamps to Acrylic Blocks.

  2. Fold the Card Base in half using a Bone Folder to sharpen the crease.

  3. Run the 4 1/2" h x 3 1/4" w basic White through the Die Cut & Emboss machine with the Dots embossing folder from the Checks & Dots Embossing Folders pack. 

  4. Wrap two strands of the Misty Moonlight Baker’s Twine from the Flowers For Every Season Trim Combo pack around the Embossed Layer, add a small piece of Fresh Freesia Open Weave Ribbon and tie a knot.  

  5. On 3” square Basic White Thick scrap stamp the Large Turtle with Tuxedo Black Memento Ink. Color head, neck, feet and tail with Old Olive Stampin’ Blends using light on body and dark on toes and use Light Balmy Blue Stampin’ Blend for the eye,  then punch out with the Turtle Punch. 

  6. On 3” square Hand-Penned DSP scrap stamp the Large Turtle with Tuxedo Black Memento Ink. Use Paper Snips to fussy cut the Shell, cutting just inside the line. Attach to Turtle with Multipurpose Liquid Glue so you can wiggle it into position.

  7. Attach to the Embossed Layer with Stampin’ Dimensionals.

  8. Attach Embossed Layer to Card Base with Stampin Dimensionals. 

  9. Stamp the Sentiment in Misty Moonlight ink on the 3/4" h x 3 1/4" w Basic White piece and then trim the ends with the Lovely Labels Pick a Punch. Attach with Stampin’ Dimensionals.

  10. Sprinkle on the gems.

  11. Stamp and decorate the 4" h x 5 1/4" w Basic White inside and attach with Stampin' Seal.

  12. Decorate your envelope.

  13. Eek so cute! I might even purposely miss someone’s birthday so I can send this one. LOL. Who will you send it to?

Shop the Online Store


My online store is open 24 hours at http://bit.ly/shopwithJaney

Please use the March 2022 online order 
host code, SY2VHV6P.

If your order is $150+ then you will earn your own Stampin' Rewards and do not use the host code.
Anyone that orders $35+ of products online, you will receive the March 2022 IDEAS tutorial bundle to show my gratitude!
Customers are also welcome to order the IDEAS tutorial bundle without a product order or to send as a gift (see the side bar for the ordering link).

Subscribe now to never miss a blog post:


Product List
Janey

Sunday, March 20, 2022

Turtle Friends Spotlight #1

Hello friends! I am so excited to share with you my next Spotlight Series on the Turtle Friends Bundle. I hope you enjoy the projects that are featured this week.  


The first project is an adorable Happy Birthday card!  Wouldn't this be a delightful card to find when you open the envelope?


This colorful card is full of cheer and fun!


Below are the supplies list and tutorial.  I hope you will enjoy making this card.  Please check back on Wednesday and Friday with 2 more designs for my Spotlight series. 

Coming on March 23, 2002 the Last Chance Products sale will start!


COLORS

Granny Apple Green

Bermuda Bay

Daffodil Delight

Flirty Flamingo


MEASUREMENTS

Complete list of supplies needed is listed below. A die cutting machine is needed for this card.

Granny Apple Green Cardstock:
5 1/2” h x 8 1/2" w folded to 4 1/4” w for Card Base

Basic White Thick Cardstock:
3” square scrap for Turtle, Hat and Bow Tie
1 1/2" square (2)
1" square

Basic White Cardstock:
3/4" h x 2 3/4" w
5 1/4" h x 4” w for inside

Pattern Party Designer Series Paper:
2” square
1" square (2)
5 1/4" h x 4” w

INSTRUCTIONS

  1. Affix all stamps to Acrylic Blocks.

  2. Fold the Card Base in half using a Bone Folder to sharpen the crease.

  3. Run the 5 1/4" h x 4” w Pattern Party DSP through the Die Cut & Emboss Machine with the Picture This Die.

  4. Stamp the turtle and hat on the 3” Basic White Thick scrap with Tuxedo Black Memento Ink and the bow tie with Daffodil Delight Ink. Then color with Bermuda Bay and Daffodil Delight. Punch out the Turtle and fussy cut the hat and bow tie.Use Multipurpose glue to attach the hat and bow tie to the turtle.Use Light Balmy Blue Stampin’ Blend to color the eye.

  5. On the Basic White 1 1/2" squares, stamp the two smaller turtles with Tuxedo Black Memento Ink. Stamp their shells with Flirty Flamingo and Daffodil Delight ink and color their bodies with Stampin’ Blends. Use Light Balmy Blue Stampin’ Blend to color the open eye.

  6. On the 1” Basic White square stamp the bird in Misty Moonlight ink.

  7. Stamp Happy Birthday in Bermuda Bay ink on the 3/4" h x 2 3/4" w Basic White Cardstock and use Paper Snips to flag the end. 

  8. Lay the Die Cut Granny Apple Green Pattern Party layer on the Card Base and begin to position the other pieces behind each circle die cut. Once you have them layered and positioned so they don’t show in other circle holes, begin to tack them down with Multipurpose glue. Attach the Die Cut Granny Apple Green Pattern Party layer with Stampin’ Dimensionals.

  9. Attach the punched turtle with a Stampin’ Dimensional behind his shell and multipurpose glue behind his head.

  10. Attach the Sentiment with Stampin’ Dimensionals.

  11. Sprinkle on the Silver & Clear Epoxy diamonds

  12. Stamp and decorate the 4" h x 5 1/4" w Basic White inside and attach with Stampin' Seal.

  13. Decorate your envelope.

  14. Adorbs! Who will you send it to?


 Shop the Online Store


My online store is open 24 hours at http://bit.ly/shopwithJaney

Please use the March 2022 online order
host code, SY2VHV6P.

If your order is $150+ then you will earn your own Stampin' Rewards and do not use the host code.
Anyone that orders $35+ of products online, you will receive the March 2022 IDEAS tutorial bundle to show my gratitude!
Customers are also welcome to order the IDEAS tutorial bundle without a product order or to send as a gift (see the side bar for the ordering link).

Subscribe now to never miss a blog post:


Product List
Janey