

.jpg)
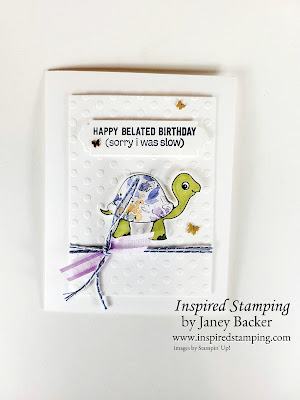
Wouldn't this card be fun to send to a girlfriend? I often need a belated card so this is a perfect design to make a few extras to have on hand.
COLORS
Misty Moonlight
Highland Heather
Fresh Freesia
Old Olive
Basic White
MEASUREMENTS
Complete list of supplies needed is listed below. A die cutting machine is needed for this card.
Basic White Thick Cardstock:
5 1/2” h x 8 1/2" w folded to 4 1/4” w for Card Base
3” square scrap for Turtle Punch
Basic White Cardstock:
3/4" h x 3 1/4" w for Sentiment
4 1/2" h x 3 1/4" w for embossed layer
5 1/4" h x 4” w for inside
Hand-Penned Designer Series Paper:
3” square scrap for Turtle Shell
INSTRUCTIONS
Affix all stamps to Acrylic Blocks.
Fold the Card Base in half using a Bone Folder to sharpen the crease.
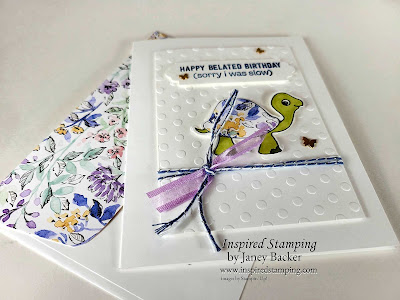
Run the 4 1/2" h x 3 1/4" w basic White through the Die Cut & Emboss machine with the Dots embossing folder from the Checks & Dots Embossing Folders pack.
Wrap two strands of the Misty Moonlight Baker’s Twine from the Flowers For Every Season Trim Combo pack around the Embossed Layer, add a small piece of Fresh Freesia Open Weave Ribbon and tie a knot.
On 3” square Basic White Thick scrap stamp the Large Turtle with Tuxedo Black Memento Ink. Color head, neck, feet and tail with Old Olive Stampin’ Blends using light on body and dark on toes and use Light Balmy Blue Stampin’ Blend for the eye, then punch out with the Turtle Punch.
On 3” square Hand-Penned DSP scrap stamp the Large Turtle with Tuxedo Black Memento Ink. Use Paper Snips to fussy cut the Shell, cutting just inside the line. Attach to Turtle with Multipurpose Liquid Glue so you can wiggle it into position.
Attach to the Embossed Layer with Stampin’ Dimensionals.
Attach Embossed Layer to Card Base with Stampin Dimensionals.
Stamp the Sentiment in Misty Moonlight ink on the 3/4" h x 3 1/4" w Basic White piece and then trim the ends with the Lovely Labels Pick a Punch. Attach with Stampin’ Dimensionals.
Sprinkle on the gems.
Stamp and decorate the 4" h x 5 1/4" w Basic White inside and attach with Stampin' Seal.
Decorate your envelope.
Eek so cute! I might even purposely miss someone’s birthday so I can send this one. LOL. Who will you send it to?
My online store is open 24 hours at http://bit.ly/shopwithJaney
Please use the March 2022 online order host code, SY2VHV6P.
If your order is $150+ then you will earn your own Stampin' Rewards and do not use the host code.
Customers are also welcome to order the IDEAS tutorial bundle without a product order or to send as a gift (see the side bar for the ordering link).
Subscribe now to never miss a blog post:
")


 Designer Series Paper")


 Open Weave Ribbon")


No comments:
Post a Comment